Device Presentation – Tekelek TEK766 Ultrasonic Liquid Level Sensor
Last modified on 06.08.2024
Today we present you one of the LoRaWAN® devices from the ZENNERShop , namely the TEK766 ultrasonic level sensor from Tekelek.
What can this sensor do? What are the advantages and what are the limitations? For which application is the sensor intended? Here you will find answers to these questions.
The Sensor
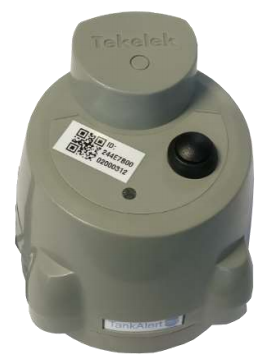
The TEK766 from Tekelek is a LoRaWAN®-based level sensor that can be used to monitor oil tanks, for example, by means of ultrasonic measurement. The results measured by the sensor are then transmitted via LoRaWAN® and can be subsequently evaluated, for example in the B.One Gallery.
Technical Characteristics
- remote configurability
- easy installation
- Up to 14 years battery life
- LoRaWAN® radio interface (868 MHz)
- up to 15 km transmission range
- CE compliant and ROHS compliant
| Device type: | Sensor Plug’n’Play |
| Technology: | LoRaWAN® |
| Place of use: | Indoor, Machine/Retrofit, Outdoor |
| Application: | Level measurement, tank monitoring |
| Industry: | Agriculture Agricultural Technology, Smart Factory Industry 4.0 |
| Protection classification: | IP67 |
| Sensors: | fill level, level |
The complete technical data can be found in the manufacturer’s official document.
Benefits and Limitations
Advantages of using the TEK766 ultrasonic level sensor:
- quick and easy commissioning –> Screw the sensor into the appropriate opening of the tank if available, otherwise drill a suitable hole in the top of the tank and screw in the sensor
- robust design
- long battery life
- easy to use and set up
A possible limitation of the sensor is that it returns the distance from the sensor to the surface of the content instead of a fill level in percent. In order to be able to make a statement about the filling level of the tank, you have to know its dimensions or measure them beforehand.
For whom and for what the Sensor is suitable
The device is perfectly tailored to its purpose of level measurement in tanks. It makes no difference for the device what the tank is filled with. A large number of liquids can therefore be monitored, such as heating oil, kerosene, water or other fuels and operating materials of all kinds. This makes the level sensor interesting for private users, but also for use by corporate customers.
Examples of use range from monitoring the heating oil tank in the basement at home to industrial use for monitoring fuel tanks in a workshop.
Where to get the Sensor
You can easily purchase the sensor together with the license for the B.One Gallery in the ZENNERShop. The only requirement: the prior or simultaneous purchase of a ZENNER IoT GatewayPLUS, which gives you access to the ZENNER Connect LoRaWAN® network.
Installation and Setup
Before you can actually use the device, you must first add it to the ZENNER Datahub. This will make it known to the LoRaWAN® network, so to speak. If you use the B.One Gallery mentioned above to visualize the sensor data, you can save yourself the trouble of adding it manually in the ZENNER Datahub by simply doing the whole thing in the B.One Gallery , as described in the Quick Guide – B.One Gallery. It will then be automatically created in the Datahub in the background.
Mounting and setting up the Sensor yourself
Included in the delivery are the sensor and the installation instructions; you can also find these online.
The first step before installing the sensor is a function test of the LoRaWAN® connection. To do this, place the sensor close to where it will later be used and hold down the button on the top for one second. The LED then starts to light up. A red indicator means that the device is connecting for the first time, while a green LED indicates that the device and the network already know each other and the join process starts directly. Success or failure is indicated by a flashing LED. More information under STEP 1 of the assembly instructions.
The sensor is now attached to the top of the tank to be monitored. If the tank already has a suitable opening, the sensor can be attached directly there. Otherwise, drill a suitable hole in the top of the tank and screw the sensor in there. The sensor has a suitable thread on the underside and an enclosed rubber seal for this. You can find illustrated instructions for assembly under STEP 2 in the assembly instructions.
STEP 3 is now a manual test of functionality. To do this, after the successful join process of the device, the button is pressed again for one second. Then wait about 10 to 20 seconds until the transmission is complete. The LED now shows the result of the test. Rule of thumb here: Green LED = successful test, red LED = an error has occurred. The exact translations of the various flashing codes can be found in the assembly instructions. It is advisable to test the connection several times to rule out any potential for errors. The sensor records the distance between the sensor and the liquid. If you measure the height of the tank beforehand, you can calculate how much of the tank is full.
Tip: with PLUGPLAY and using the B.One Gallery an alarm can be set as soon as a certain limit is exceeded. We will describe how this works using the example of geofencing with a GPS tracker or also in the blog post “B.One Gallery Howto: Set up manage notifications“
Behavior of the Sensor
When the sensor is fully set up, it measures the distance of the liquid from the sensor every 1.5 hours. It then sends a package every 6 hours with the 4 values that it measured during this time. If you now know the dimensions of your tank, as described above, you can use this to calculate the filling level. In addition, the sensor also measures and transmits the temperature and, in addition, its battery level.
Evaluation with the B.One Gallery
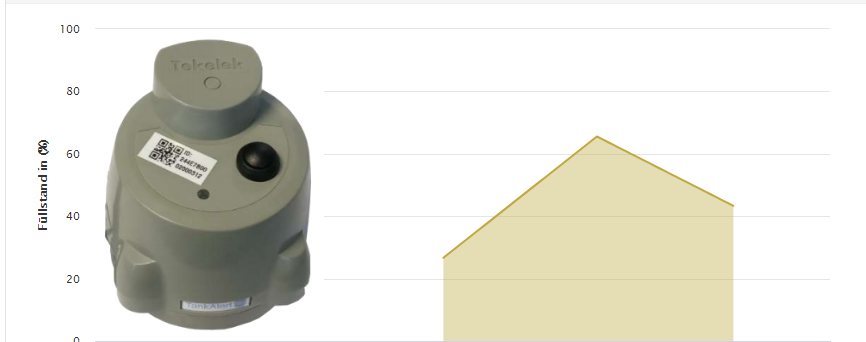
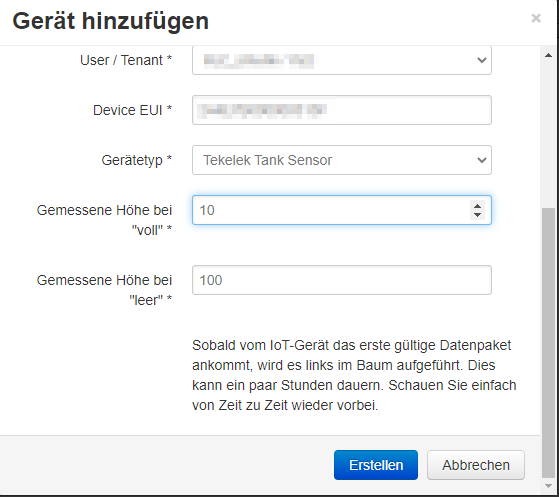
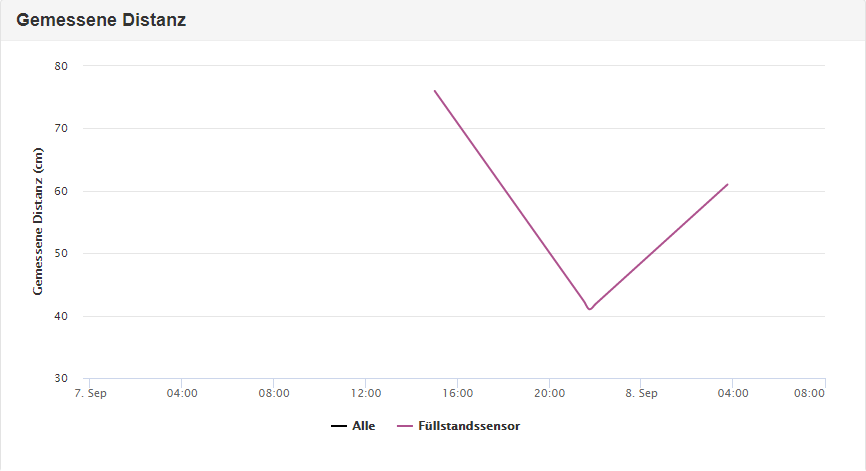
If you have purchased the PLUG&PLAY option, you can also evaluate the sensor using the B.One Gallery . Two distances can be entered here when applying the sensor. Once the distance from the sensor to the liquid when the tank is full and once for an empty tank. In the example here, there is still a distance of 10 cm between the sensor and the liquid when the maximum filling level is reached, and 100 cm when the tank is completely empty.
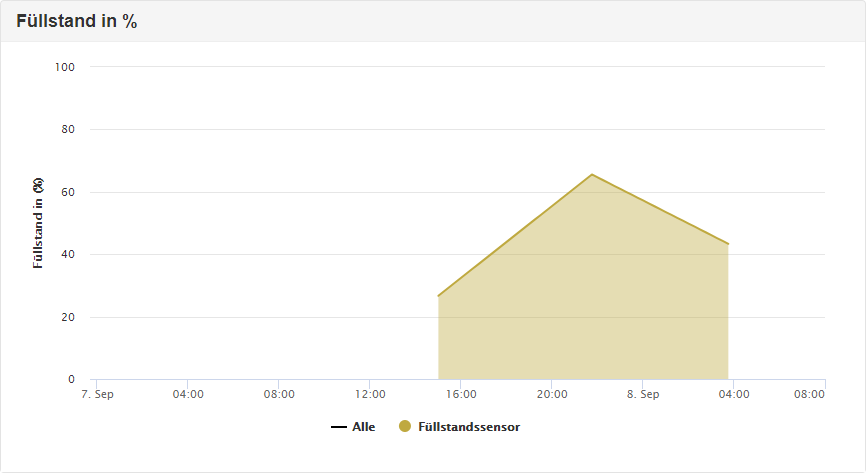
There are two diagrams in the B.One Gallery . One represents the percentage of fill and one represents the measured distance. The two diagrams here refer to my previously determined sizes of the tank. The smaller the measured distance from the sensor to the tank content, the higher the level.
Closing
Have you already had experience with this sensor yourself or do you have any questions? Then feel free to leave it in the comments!
Recommend0 recommendationsPublished in Sensors, Use Cases, ZENNER IoT PLUG&PLAY


Responses